Smart Refrigerator Management System
A Solution to Your Smart Home
By Fengkai Tang (ft243) & Zekai Li (zl874)
Completion Date: December 8th 2023
Demonstration Video
Introduction
The idea of a "smart kitchen" has changed from being a futuristic notion to a workable solution for everyday convenience and improved food management in the era of the Internet of Things (IoT). The smart refrigerator, an appliance that has gone beyond its conventional function to become a central hub for household food management, is at the center of this revolution. Our project, the Smart Fridge Management System, aims to improve our grocery handling and storage practices by introducing intelligence, efficiency, and sophistication.
The Smart Refrigerator Management System is designed to bring sophistication, efficiency, and intelligence to the way we store and handle our groceries. This innovative system employs cutting-edge sensor technology, Computer Vision, database and user-friendly interfaces to monitor and manage the contents of your refrigerator. By scanning the barcode, the system recognizes all the information about the item. It not only tracks expiration dates and alerts when something is expired, but also memorizes the items' location inside the refrigerator for your fast search.
Project Objective:
- Enable real-time monitoring of temperature and humidity inside the refrigerator
- Develop a database to track item expiration date and store item location
- Develop computer vision algorithm
- Develop user-friendly interfaces
- Develop hardware to support refrigerator operations
Design
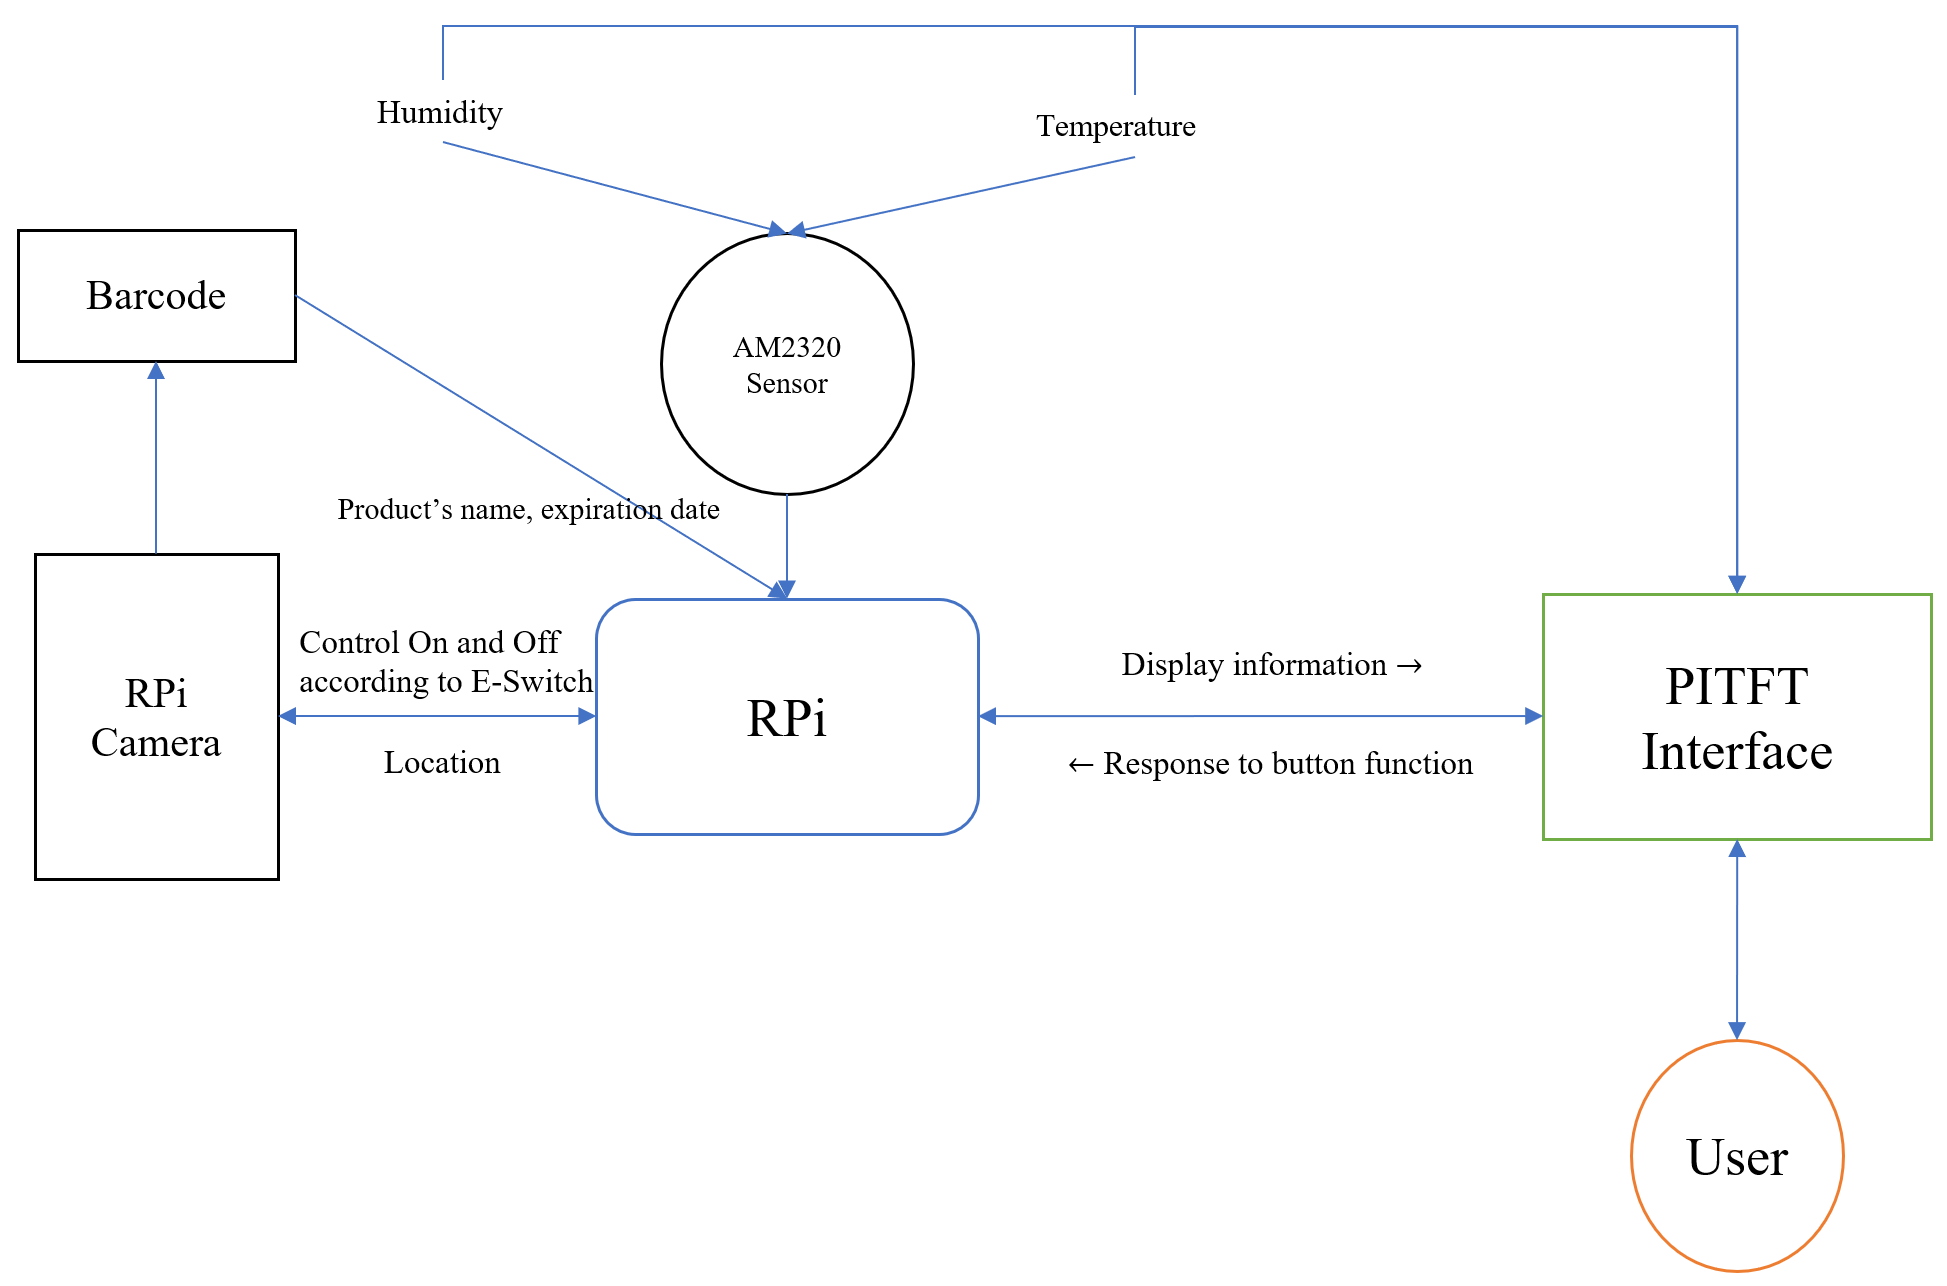
We decided to design a smart refrigerator management system that could record the name of the stored item, the expiration date of the item and the location of the item in the refrigerator. The system can also display the number of days remaining for the stored items and issue an alarm when the items have expired. In addition, the system monitors the temperature and humidity of the environment inside the refrigerator, which helps the user to check whether the refrigerator is working properly and serves as a reference for the user to adjust the temperature for better storage of the items. The RPi was the control center for the management system. It was used to read the sensor data, display the GUI, open the camera, and connect to a remote API.
Sensor
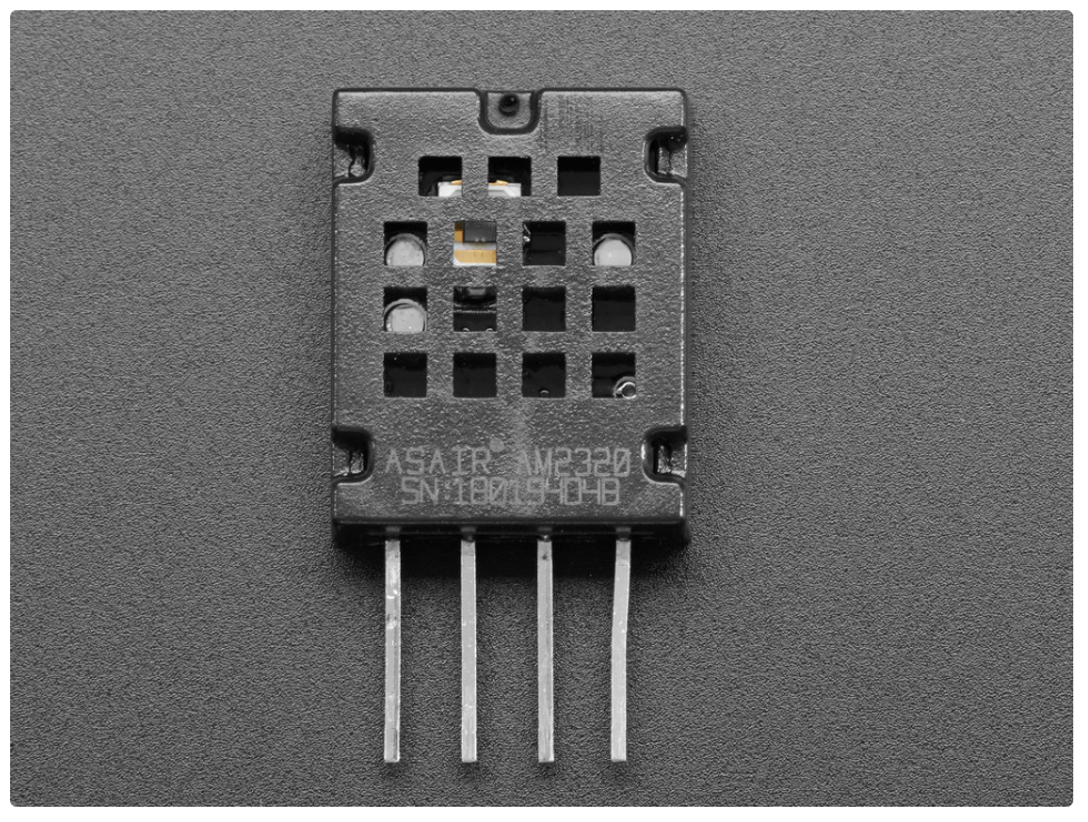
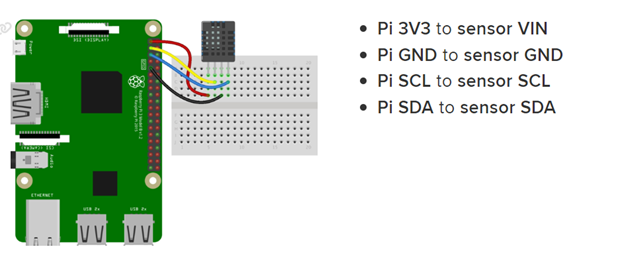
In the design of our Smart Refrigerator Management System, the AM2320 digital temperature and humidity sensor played a pivotal role. Chosen for its high reliability and precision, this sensor provided real-time environmental data crucial for maintaining the optimal climate within the refrigerator. Starting from the left, the pins are: 1. VDD (power in, can be 3-5VDC), 2. SDA (I2C data in/out), 3. GND and 4. SCL (I2C clock in). Figure 3 shows the pin of AM2320 sensor. It is supposed to have pullup resistors of 2-10K for this sensor when connecting SDA pin to VDD and when connecting SCL pin to VDD. As the Raspberry Pi has built-in pullup resistors on SDA and SCL so we did not add external pullup resistors. Shown in Figure 2, connect the Raspberry Pi 3V3 pin to sensor VDD, Raspberry Pi GND to sensor GND, Raspberry Pi SCL to sensor SCL and Raspberry Pi SDA to sensor SDA, which was a quite straightforward layout.
To begin, we updated the Raspberry Pi's package list and upgraded the existing packages to their latest versions, ensuring compatibility and security. Then, we installed the Adafruit CircuitPython library for the AM2320 sensor, which simplified the interaction with the sensor, allowing for straightforward temperature and humidity readings. At last, install Adafruit’s Blinka library which was crucial component that acts as a bridge between CircuitPython and the Raspberry Pi's GPIO pins. After doing so, the sensor was expected to read temperature and humidity values all the time. The Raspberry Pi processed the data and then shown them on GUI to let users have a clear view about the situation inside the refrigerator. Below commands may help you install the necessary libraries.
sudo apt-get update
sudo apt-get upgrade
sudo pip3 install adafruit-circuitpython-am2320
sudo apt-get install -y i2c-tools libgpiod-dev python3-libgpiod
pip3 install --upgrade RPi.GPIO
pip3 install --upgrade adafruit-blinka
GUI
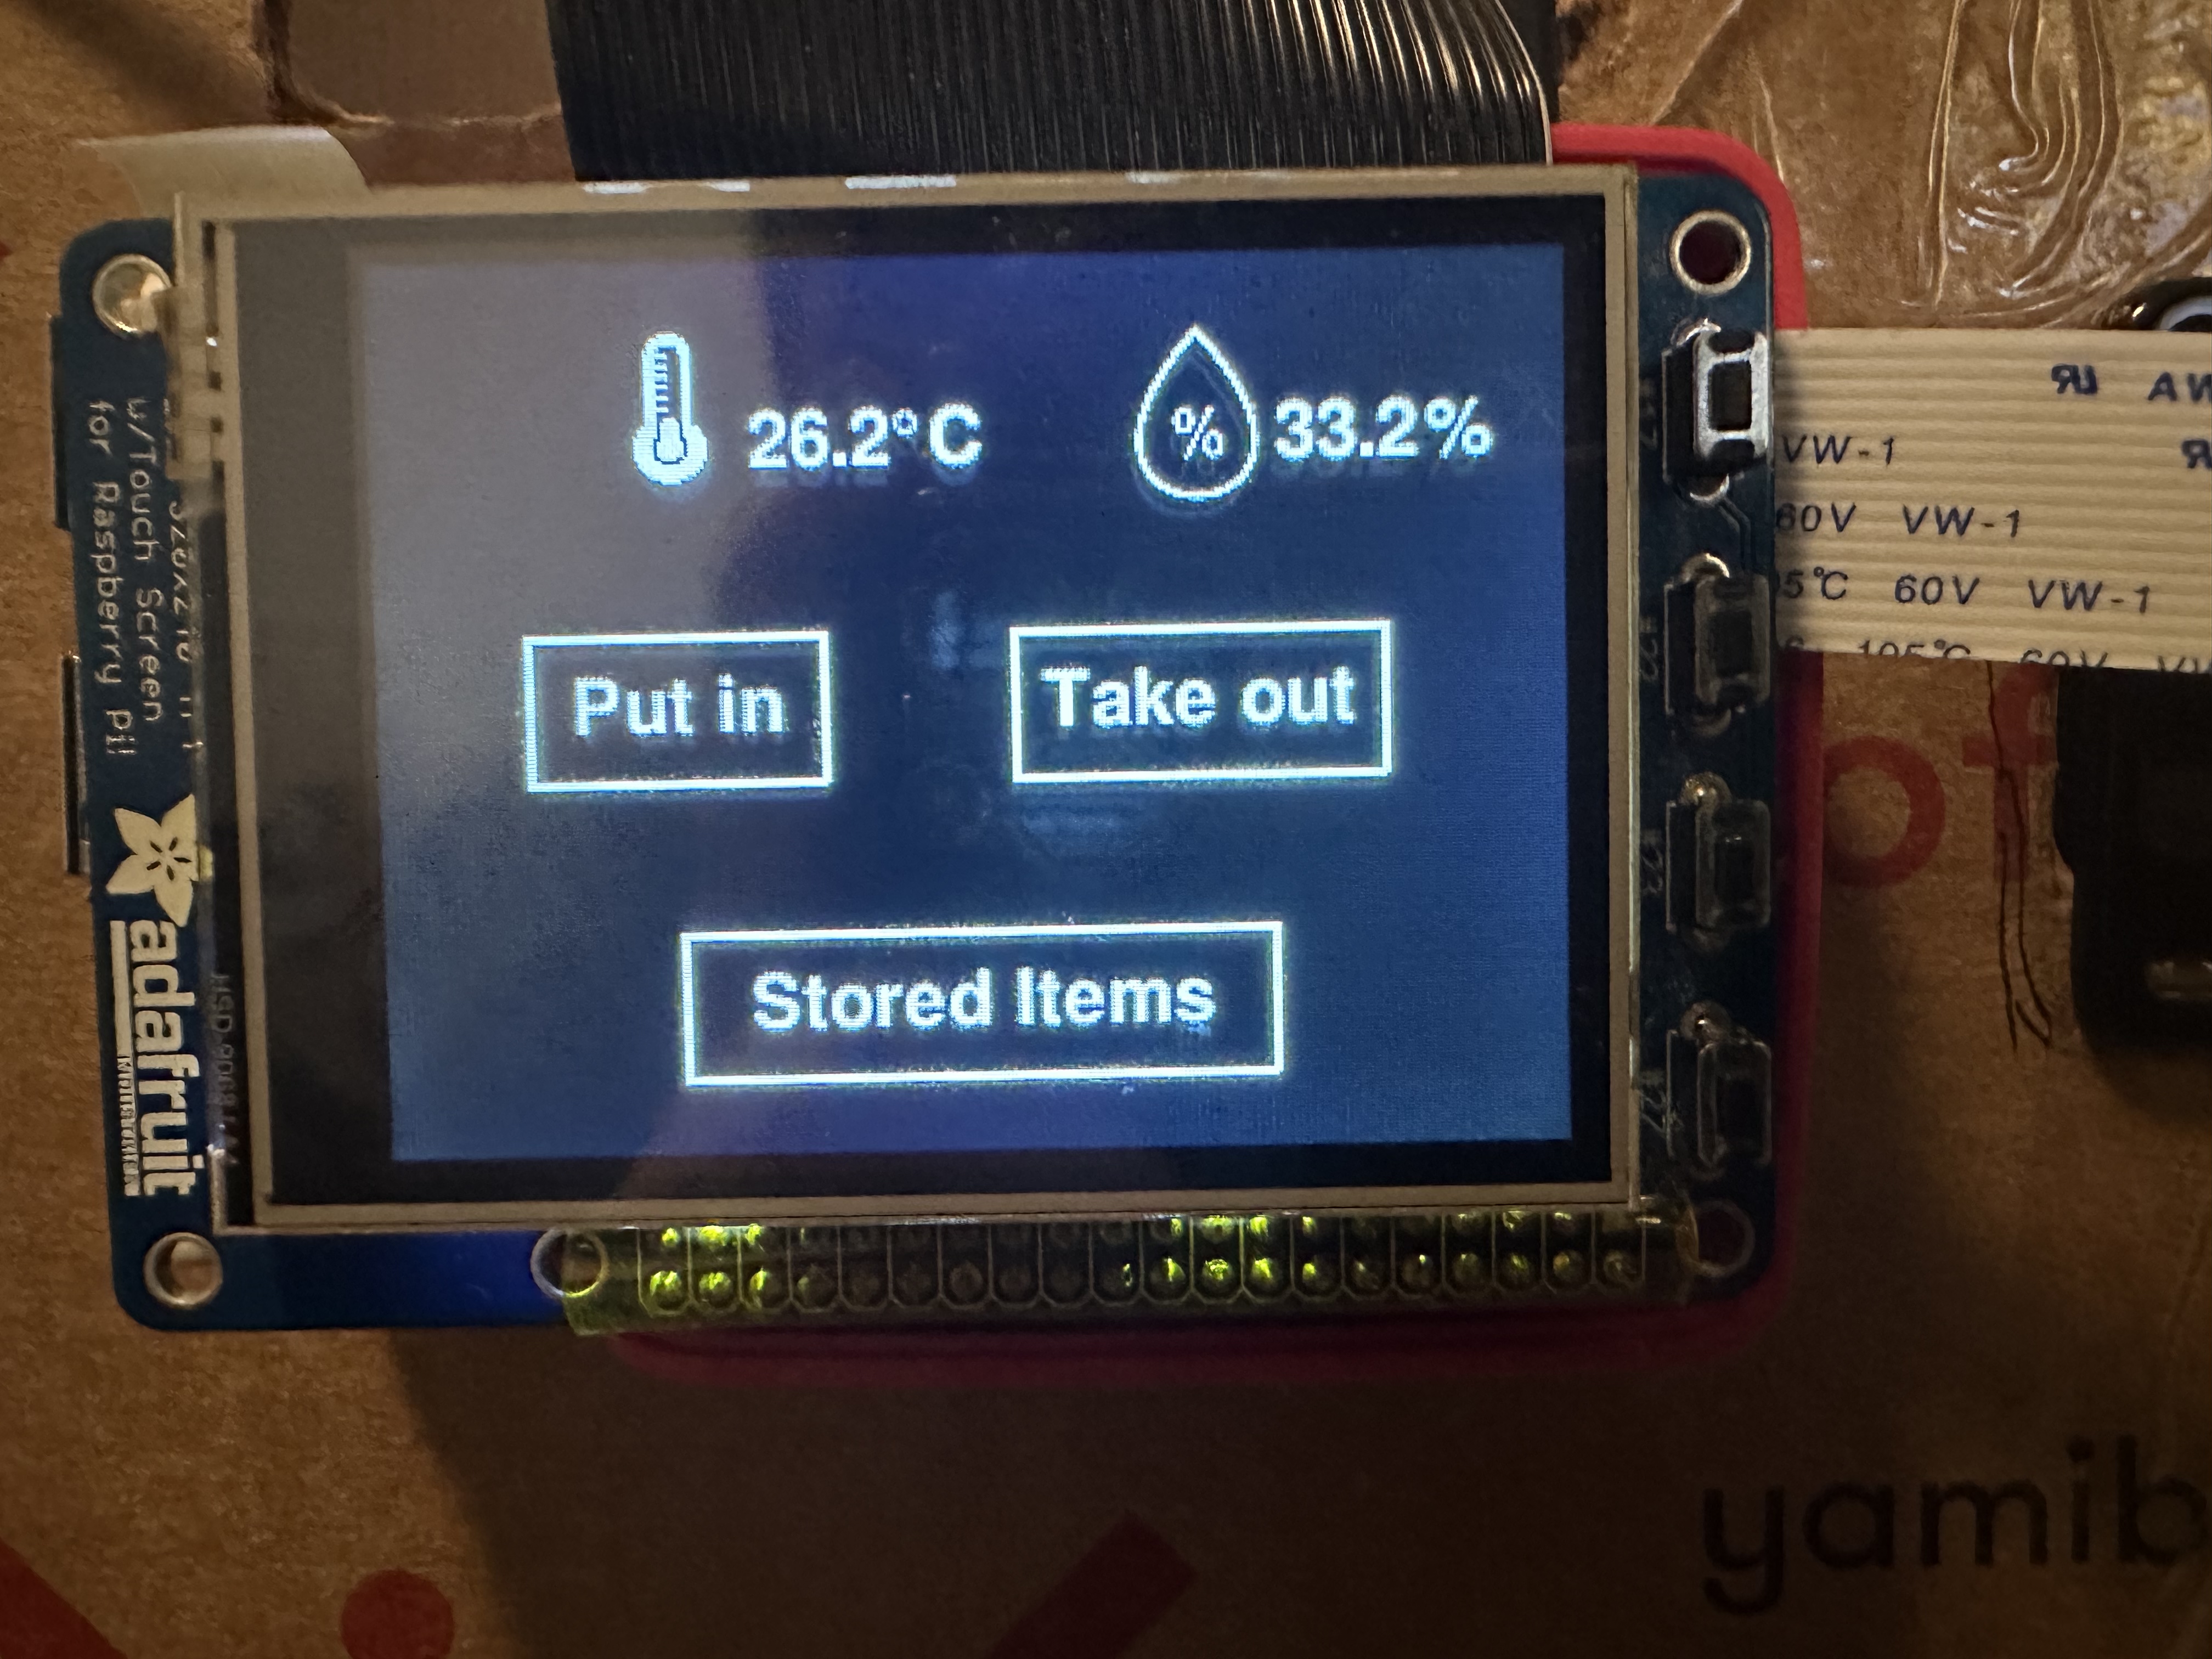
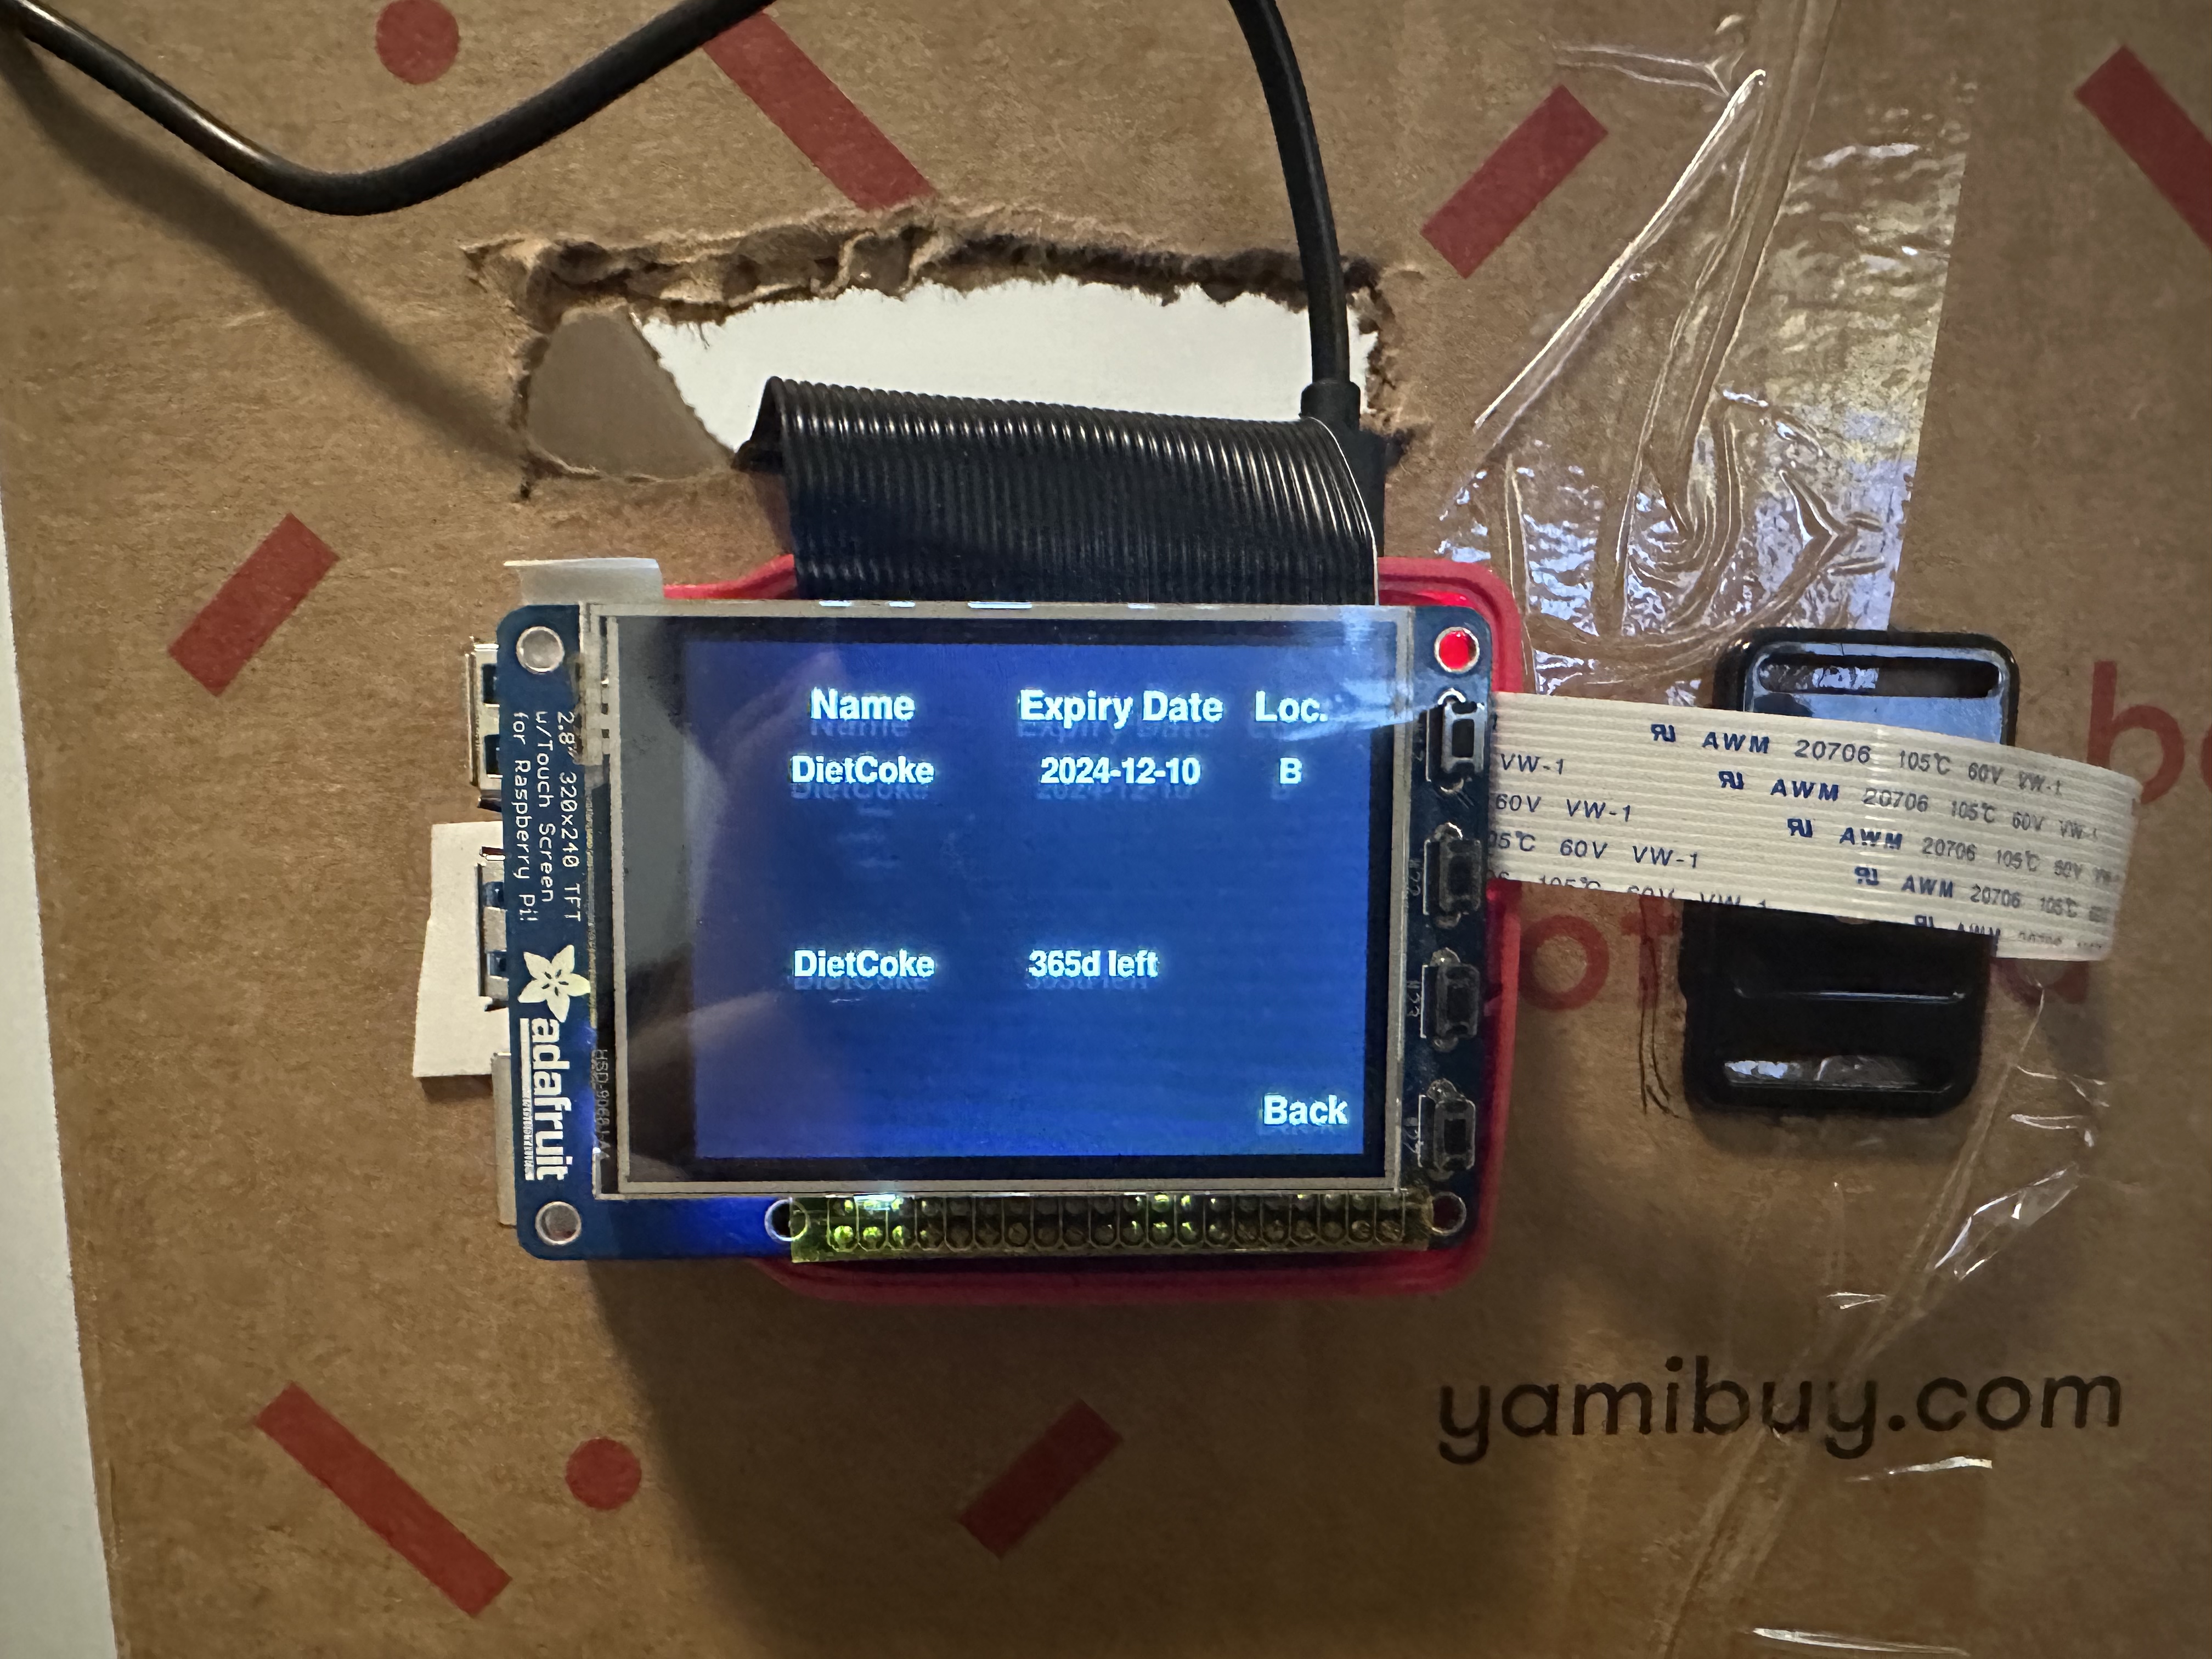
Our Smart Refrigerator Management System was equipped with an intuitive GUI, displayed on a compact PiTFT touchscreen, bringing convenience right to your fingertips. On the first page of the GUI, the temperature and humidity data of the refrigerator, with large, easy-to-read icons, was always displaying to give a clear sight, ensuring the users are always informed about the internal conditions. Then we designed three buttons on the first page, which were “Put in”, “Take out” and “Stored Items” buttons, each corresponding to one specific function. The below figure is for your reference. The “Put in” button was used to put the items into the refrigerator, as name suggesting. By pressing it and scanning the barcode of the item, all the information about this item was stored to the database. It provided the user to enter the expiration date manually to help the smart system track and alert if it was expired. The “Take out” button was used to take something out. This process did not need anything else to do but open the refrigerator door, take something out and close the refrigerator door. The Raspberry Pi would automatically update the database by comparing what item was removed. The “Stored Items” was used to display all the things inside the refrigerator, including their name, their expiration date, their location inside the refrigerator and how many days were left or if it was already expired.
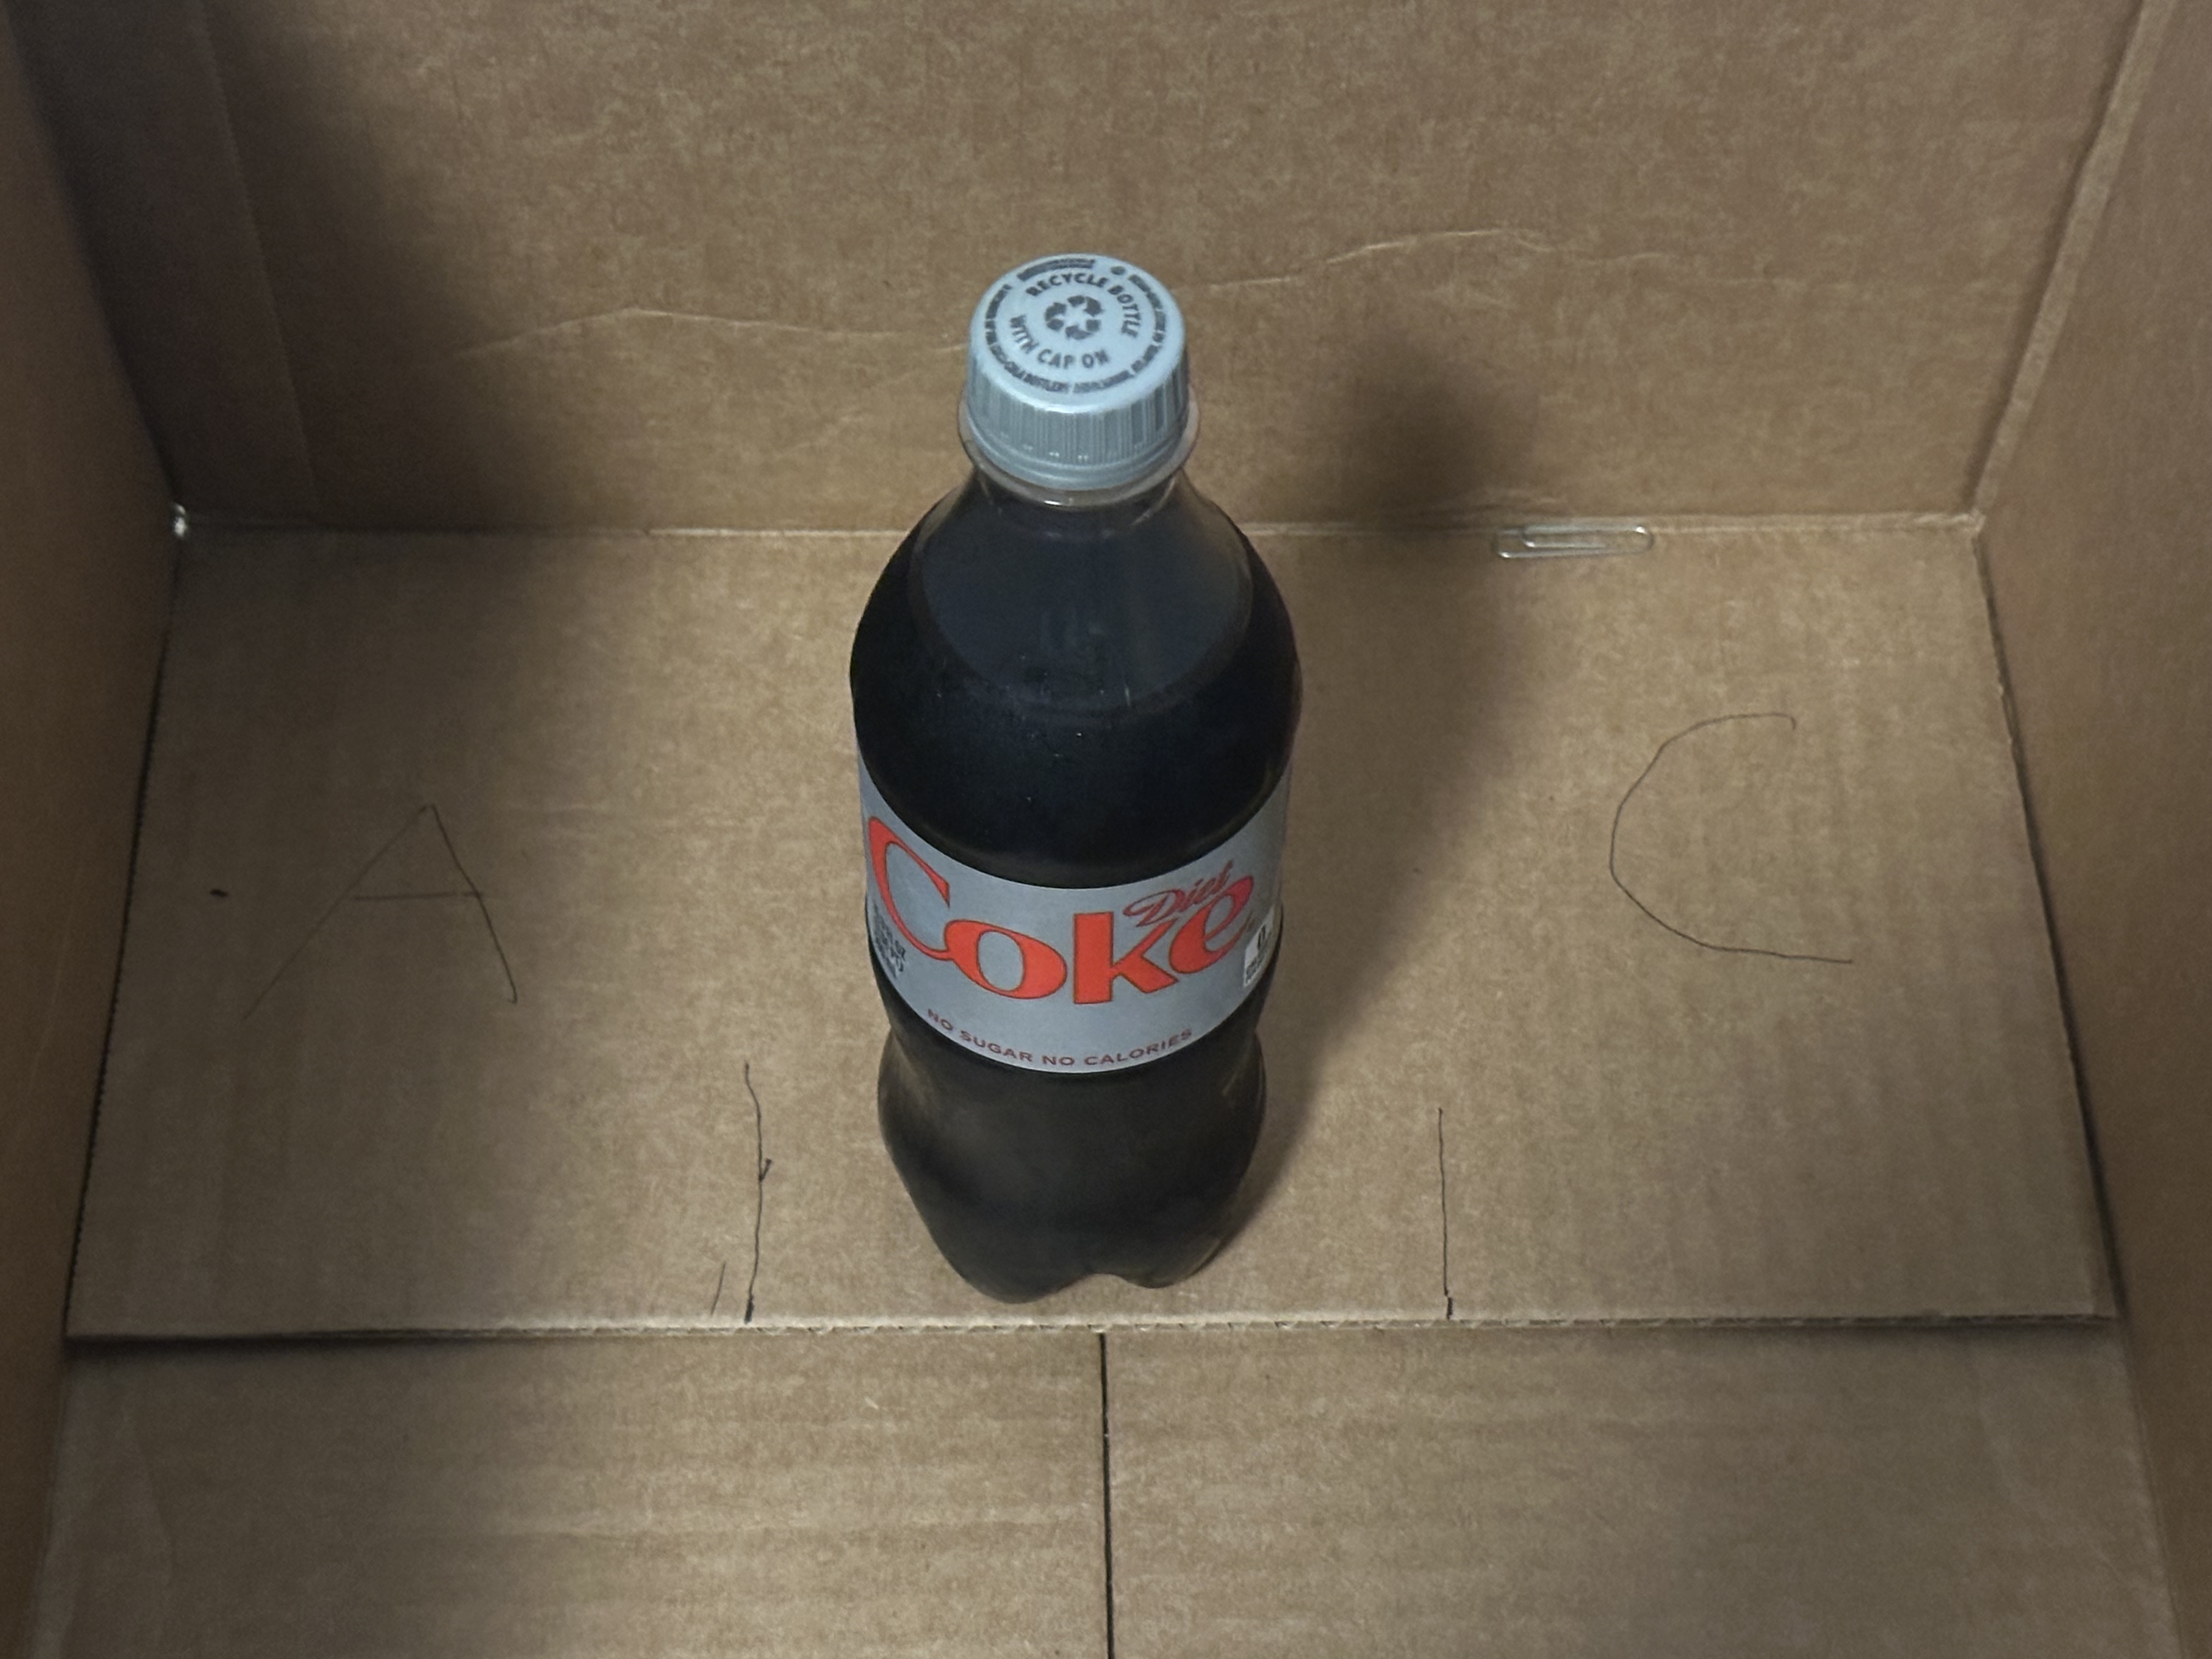
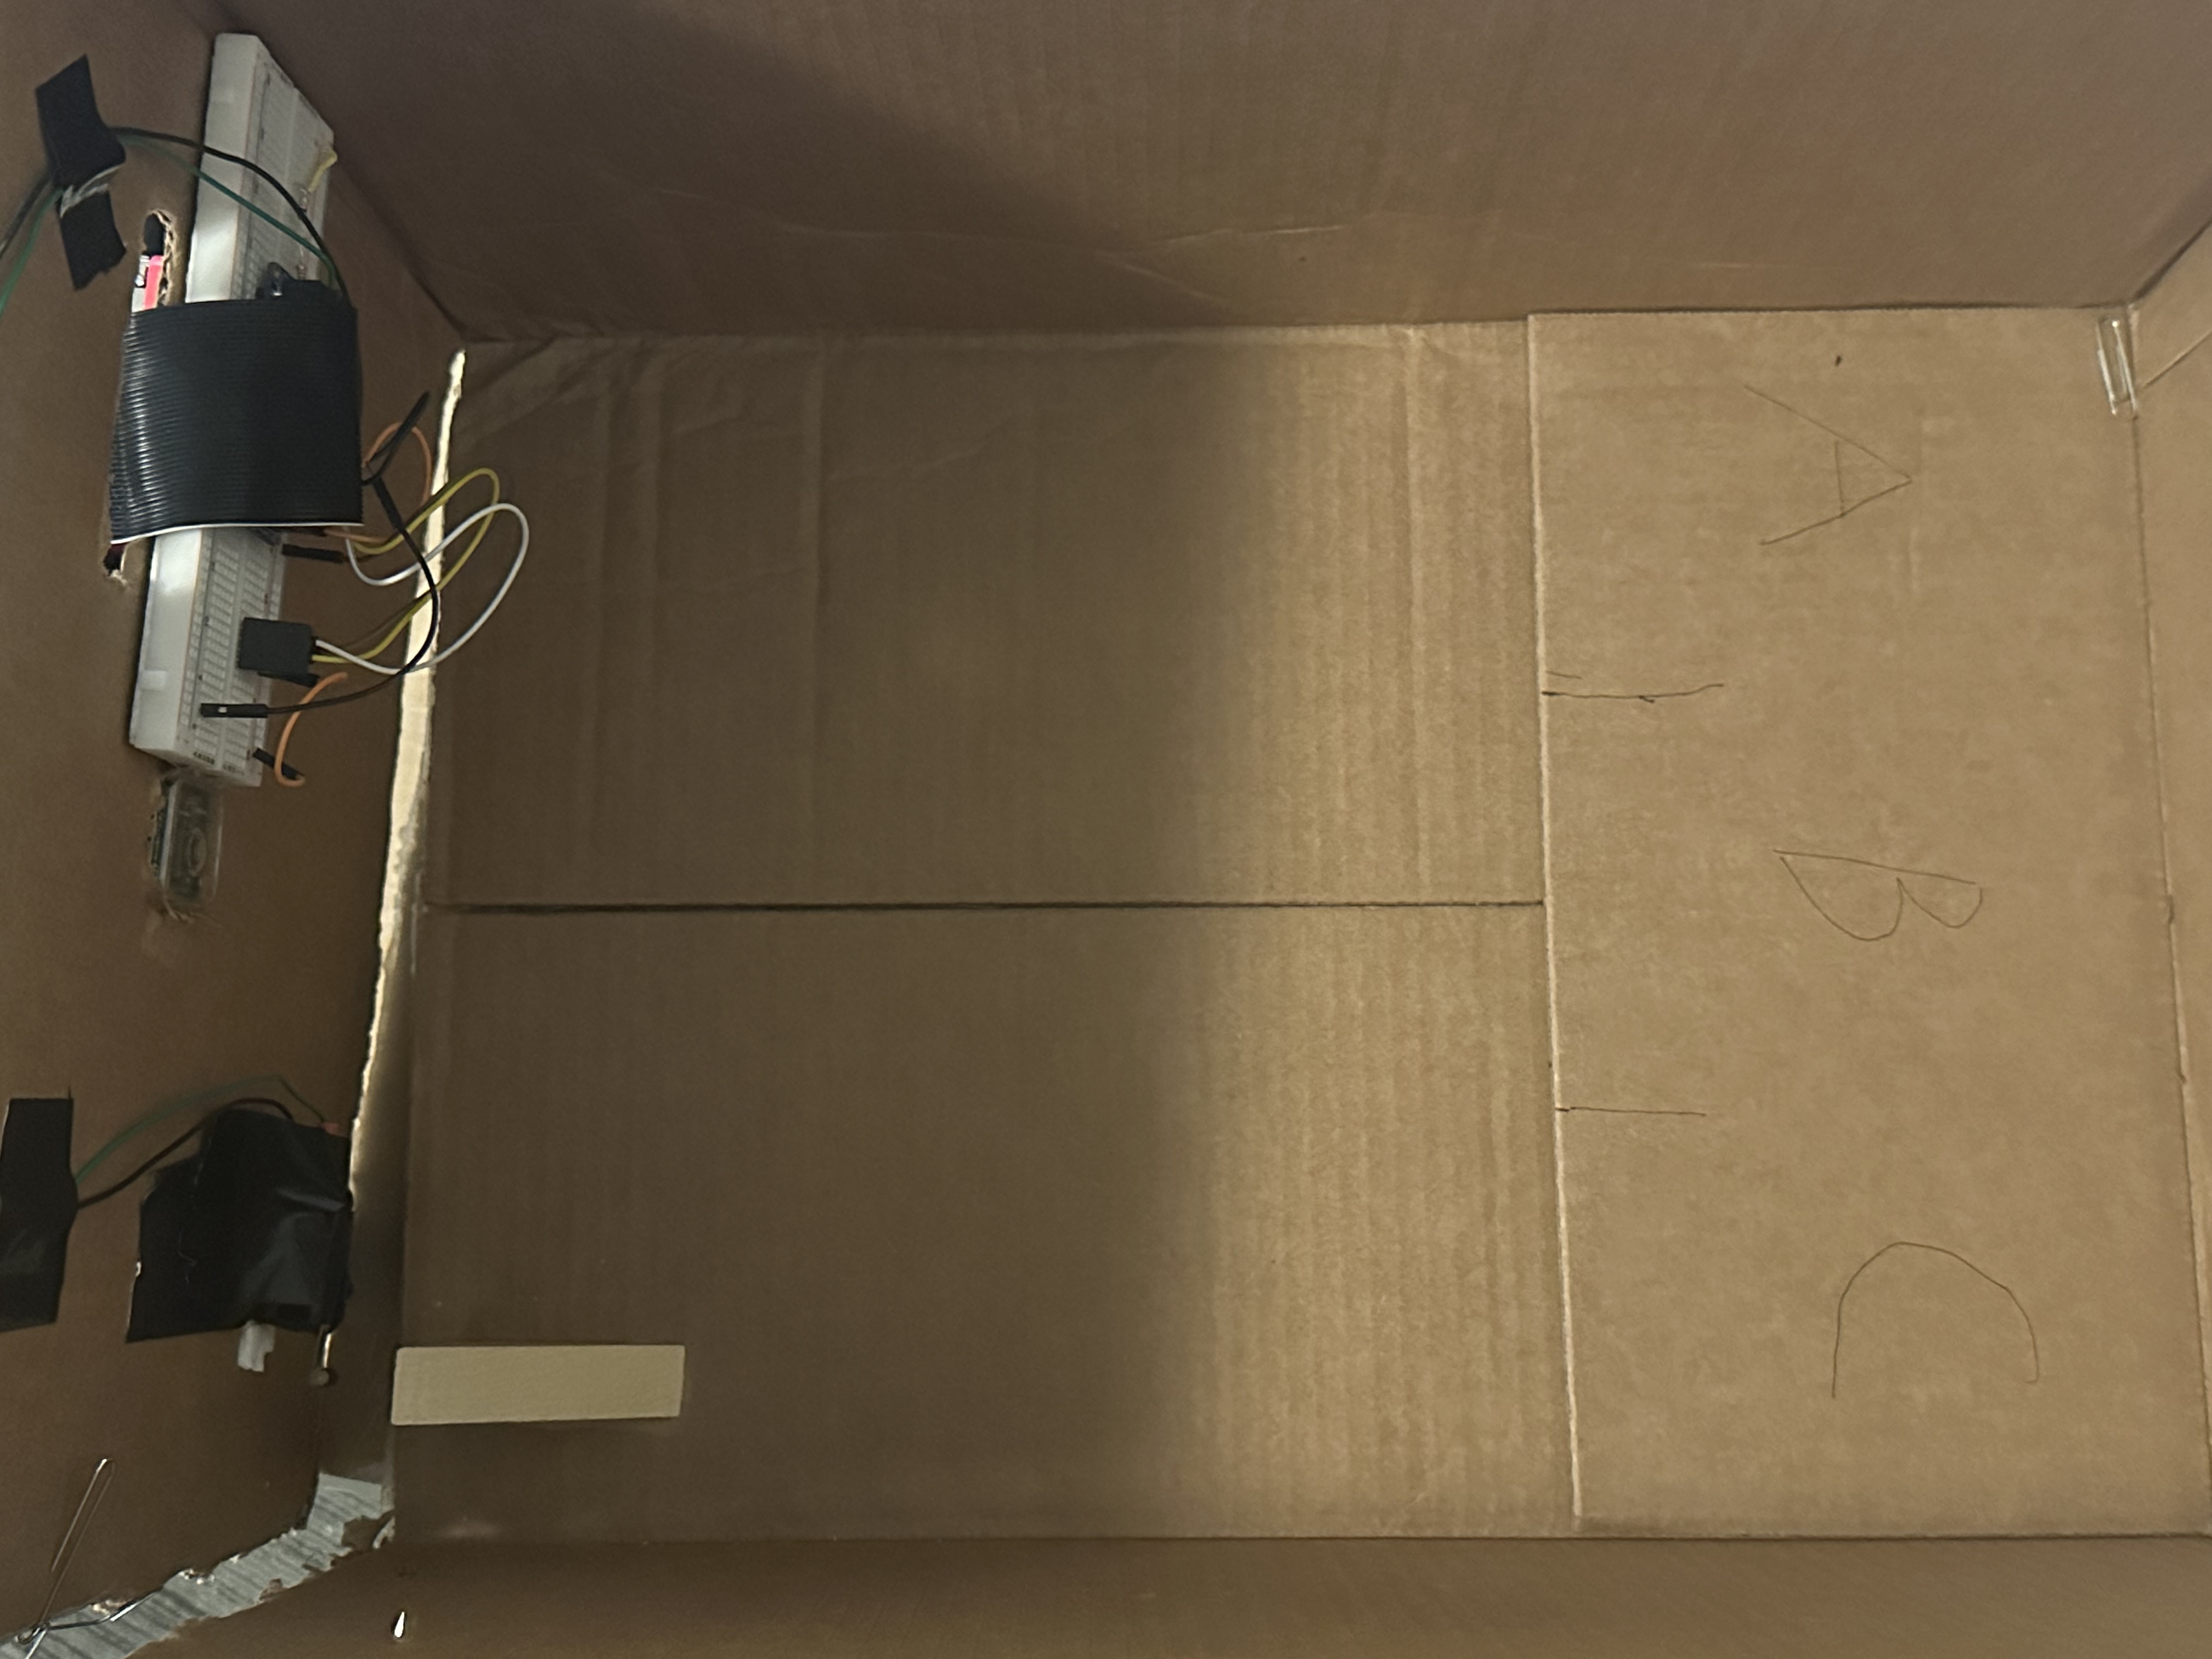
Location detection
We used Picamera and OpenCV to detect the location of items. To enable the Camera, we opened the RPi configuration and turned on the camera support. The resolution of the Camera was set to (640, 480). The strategy we used was to compare the images inside the refrigerator before and after the user puts in or takes out the item. The system would capture an image at startup and another image when the user put in an item or removed an item and closes the door. By comparing these two images, we can determine where the item was placed in or removed from the refrigerator. Next time, when the user put in an item or removed an item and closed the door, the first stored image will be popped up and the new image will be added to the end of the array and then by comparing these two new images we can get the location of the item.
The comparison of images was carried out using OpenCV. Initially, both images were converted to grayscale. The pixel values of the two images were then subtracted to obtain the difference matrix. To obtain a binary mask, the difference matrix was thresholded within the range of 50 to 255. To reduce noise, an open and close operation was applied to the binary mask. The contour within the binary mask was found and drawn. The largest contour was selected in order to filter out any small noise, with a threshold value of 2000 for the largest contour area.
Barcode reading
First, the two libraries for barcode recognition, Zbar and pyzbar, were installed. Notice that OpenCV also needed to be installed to use these libraries. The camera was set up to capture video and read frames continuously. The built-in functions in pyzbar were used to examine each frame captured by the camera and detect the barcode. When a barcode was detected, the pyzbar function would return the barcode number. In order to read the product name, we connected the system to the product data database via an API. By sending the barcode number and requesting the API, we can get a Json file containing the product name.
E-Switch
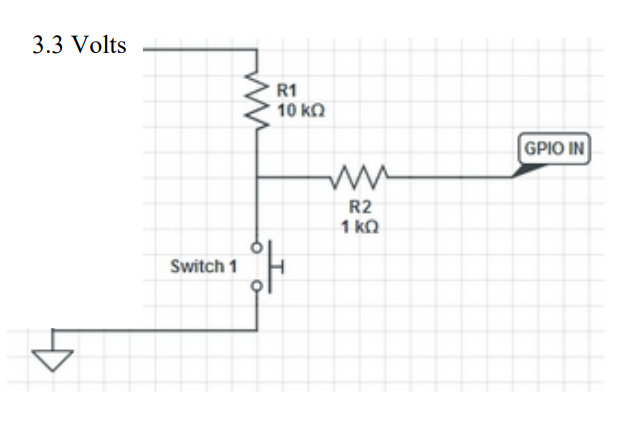
The LS-085 Switch was used to detect the door status. When the door was closed, the switch was closed, and it could be considered as the short-circuited. When the door was opened, the switch was opened and could be considered as open-circuited. The connection method to realize this logic for the switch was shown below.
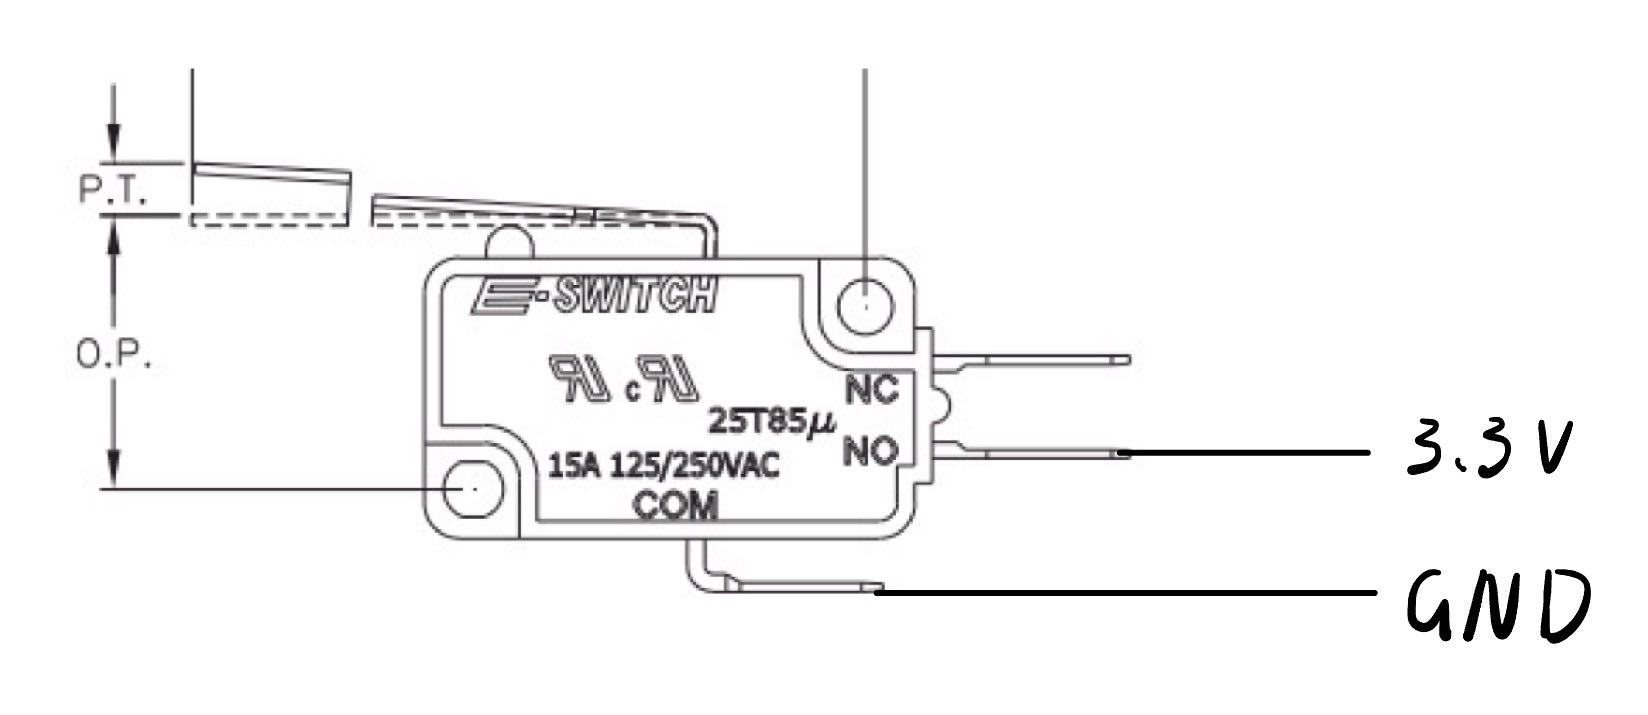
We connected the E-switch to the GPIO 26 with the active low method. The circuit figure was shown below.
Testing
Sensor
During the installment of necessary libraries and dependencies for AM2320 sensor, we met some errors. adafruit-circuitpython-am2320 library and blinka library cannot be installed initially, and we thought it was the version of Raspberry Pi kernel that was not compatible with them. We tried Lab 2 kernel but it failed too. According to some online tutorials, it was recommended to install all of them in a virtual environment and we thought this might be the reason. However, it was not, a virtual environment did not help to install them successfully. At last, we plugged an ethernet cable to the Raspberry Pi and it suddenly worked! It turned out that Wi-Fi would cause pip connection failure for some installment, and an ethernet cable was much stable. After installing all the necessary libraries and dependencies for AM2320 sensor, it would be better for us to test it if working properly or not. Here we also confronted some problems. We cannot read anything from the sensor at the beginning, which made us think that we had a wrong wiring or broken sensor. After carefully checking the wiring and ensuring that the Raspberry Pi read the I2C location, we knew that neither of them was the reason. Use command "sudo i2cdetect -y 1" to check the I2C location (shown below, the address was 5c). When doing this, we were aware that the sensor sometimes it was asleep and cannot read the data if we only wrote a single while loop. Eventually, we tried two wrote "try and except" to let sensor try to read all the time and skip if the sensor was asleep. The reason for two "try and except" was that the sensor can only read one data, either temperature or humidity at a time, so one "try and except" would cause one data not be obtained. This worked and we got the temperature and humidity data on the Raspberry Pi.
sudo i2cdetect -y 1
  0  1  2  3  4  5  6  7  8  9  a  b  c  d  e  f
  00:          -- -- -- -- -- -- -- -- -- -- -- -- --
  10: -- -- -- -- -- -- -- -- -- -- -- -- -- -- -- --
  20: -- -- -- -- -- -- -- -- -- -- -- -- -- -- -- --
  30: -- -- -- -- -- -- -- -- -- -- -- -- -- -- -- --
  40: -- -- -- -- -- -- -- -- -- -- -- -- -- -- -- --
  50: -- -- -- -- -- -- -- -- -- -- -- -- 5c -- -- --
  60: -- -- -- -- -- -- -- -- -- -- -- -- -- -- -- --
GUI
To test the GUI of our smart refrigerator system, we firstly added printing function to almost everywhere to make sure if something went wrong, we can refer to the print in the command window to find the problems. For our GUI, every button led to a new screen, so it was quite intuitive to test. We met a problem when trying to switch from GUI to PiCamera, which allowed the user to scan the barcode. It was always working well for the first time we opened the PiCamera, and always went wrong for the second time. This was due to we forgot to close the PiCamera after the barcode was successfully scanned, and it would lead to out of source. Another annoying problem was that the E-Switch cannot maintain its status although it was open, which caused our GUI switched screens even though the user was not prepared to do so. By using oscilloscope to monitor the status of E-Switch, it was found that it was floating and never be stable. We figured it out and did not use the state of E-Switch to control the GUI, but a way similar to state machine. Lastly, we tested the GUI with rapid consecutive inputs to verify the system's durability. Every button was tested and this user-friendly GUI was ready to launch.
Location detection
First, we try to install OpenCV in Lab 3 Week2 environment, but due to the touch screen setting, there would be “stable” error when trying to install OpenCV. The solution was:
    cd /etc/apt/apt.conf.d
    cat 10defaultRelease #The file entry causing the issue
    sudo mv 10defaultRelease 10defaultRelease.orig #Rename the file
    ls -l # To check if the rename worked
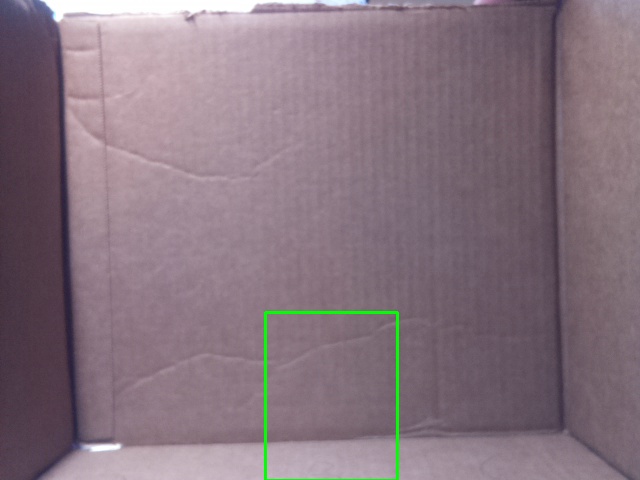
In order to test and adjust the thresholds for generating the binary mask and the minimum acceptable contour area, a separate program was developed, and different objects were used to check the results of the comparison of the images to see whether the center of the changing object was returned correctly. Here are some testing results.
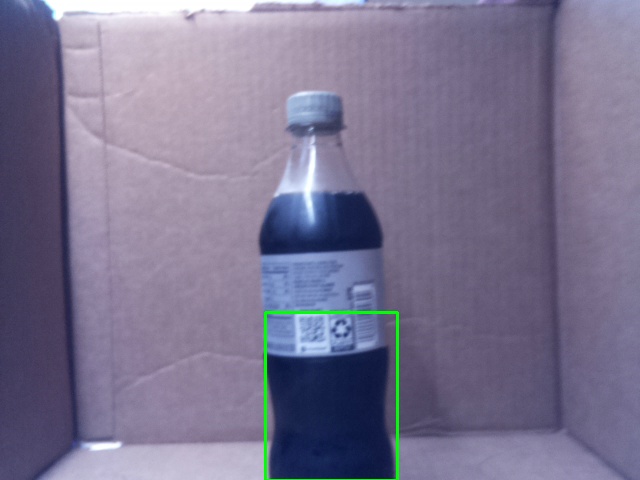

Another problem with position detection is that when using some transparent plastic bottles, the background is recognized as unchanged and the contour is only on the label portion of the bottle, which can lead to detection errors. We have not found a good way to solve this problem yet.
Barcode reading
To test the barcode reading function, we first took some pictures and then used the pyzbar function to recognize the barcode. Since the phone's camera has a high resolution and focuses on the barcode, it was easy to read the barcode from the pictures taken by the phone. We then used Picamera to capture the video and recognize the barcode. Initially, it was difficult to read the barcode using the Picamera because the Picamera has a fixed focal length and could not focus on the barcode. In this case, we manually adjusted the Picamera's focus to about 13 cm from the barcode. Therefore, when we want to scan a barcode, we need to place the item about 13 cm away from the Picamera. After this adjustment, the barcode reading function worked. To test API function, we created a program and set a fixed barcode number and if API worked normally, when we executed the program, it should return the Json file of that product. Another issue we encountered here was that in the lab, we needed to connect network cable to RPi to connect to the Api, if we used the WIFI in the lab then the API won’t work.
E-Switch
First the switch was tested on an external circuit. After using an oscilloscope to ensure that the switch was performing well, we connected the switch circuit to the RPi. The problem we encountered here was that although we had set GPIO 26 to monitor only the falling edge of the input, the switch triggered an interrupt both when it was closed and when it was opened. This problem could be caused by a bad connection between the wires and the switch. To solve this problem, we wrote a simple state machine that allows the system to ignore every second detected event.
Result
The deployment of the Smart Refrigerator Management System yielded promising results, demonstrating the practicality and efficiency of integrating smart technology into household appliances. When holding the sensor, the temperature and humidity data climbed rapidly as expected, and putting the refrigerator box outside, the temperature data dropped to 0 as expected as well. The sensor was believed to be accurate enough to show the refrigerator condition within a margin of error of 1 Celsius degree. The GUI on the PiTFT displayed all the necessary information about the refrigerator, including temperature, humidity, item’s name, item’s expiration date, item’s location and how many days left for the item or an alert for those has been expired. GUI switched screen smoothly and every part was working as expected. The PiCamera read the barcode of the item rapidly and accurately and the E-Switch signal controlled the open and close of the PiCamera without errors. Every time the door was closed, the PiCamera took a picture and compared the pixels differences to tell the location of the item. The database kept updating to track all the items inside the refrigerator. As long as the Raspberry Pi is connected to the network and the API serve does not break down, the refrigerator system can work forever, implementing your smart home.
In conclusion, our group developed a smart refrigerator system from nothing and achieved all the goals we set in the proposal. All the applications we planned to do were developed successfully. The GUI is so user-friendly that everyone can use it without any instructions. In the process, we encountered a variety of problems. But fortunately, with the joint efforts of our group and the advice of our professor, we overcame them. Nevertheless, there are still some places we can improve.
Future Work
Although the system is currently working well, there are still many areas for improvement. First, we plan to add new features to the system, such as the ability to recognize a change in the location of an item if the user simply moves the item in the refrigerator from one place to another. In addition, we would like to extend our model to multiple levels so that it can contain more items. Right now, since we only have one camera, the user has to open the refrigerator door and scan the barcode, which is not convenient. Therefore, in the future, a camera can be added to the system to read the barcode outside the door, while the other camera can be responsible for photographing only the inside of the refrigerator to detect changes in the items. In addition, instead of using a list in python, we will use an external database to store information about the stored items so that more information can be better stored and can be displayed in a remote website.
Work Distribution

Project group picture

Zekai Li
zl874@cornell.edu
- Designed the code for barcode reading
- Designed the code for location detection
- Tested and integrated E-switch into the whole system

Fengkai Tang
ft243@cornell.edu
- Designed the GUI
- Integrated all functions into the system
Parts List
- Raspberry Pi $35.00 - Provided in Lab
- Raspberry Pi Camera V2 $25.00 - Provided in Lab
- PiTFT $34.95 - Provided in Lab
- AM2320 Sensor $3.95 - Provided in Lab
- LS-085 E-Switch $2.29 - Provided in Lab
- Resistors and Wires - Provided in lab
Total: $101.19 - all provided by Lab
References
AM2320 Sensor PinoutsAM2320 Sensor Tutorial 1
AM2320 Sensor Tutorial 2
AM2320 Sensor Reading Problem Solution
PiCamera Document
PiCamera tutorial
E-Switch datasheet
Zbar tutorial
Lab2 Week1 handout
Product database API
OpenCV installation
Code Appendix
Menu.py
# Fengkai Tang (ft243) & Zekai Li (zl874)
  # Thursday Lab, Group 8
  # ECE 5725 Fall 2023 Final Project
  # menu.py
  import pygame
  from pygame.locals import *
  import os
  import time
  import RPi.GPIO as GPIO
  import subprocess
  import math
  from threading import Thread
  import threading
  import board
  import busio
  import adafruit_am2320
  import cv2
  from picamera import PiCamera
  from picamera.array import PiRGBArray
  from pyzbar import pyzbar
  from datetime import datetime
  import requests

  i2c = busio.I2C(board.SCL,board.SDA)
  am = adafruit_am2320.AM2320(i2c,address=0x5c)

  def get_temperature():
    while True:
      try:
        t = am.temperature
        return t
      except Exception as e:
        print("Error reading from the sensor: ",e)
        #print()

  def get_humidity():
    while True:
      try:
        h = am.relative_humidity
        return h
      except Exception as e:
        print("Error reading from the sensor: ",e)
        #print()

  def display_menu(button,font):
    for my_text,text_pos in button.items():
      text_surface = font.render(my_text, True, WHITE)
      rect = text_surface.get_rect(center=text_pos)
      screen.blit(text_surface, rect)

  def display_menu_red(button,font):
    for my_text,text_pos in button.items():
      text_surface = font.render(my_text, True, (255,69,0))
      rect = text_surface.get_rect(center=text_pos)
      screen.blit(text_surface, rect)

  def read_barcodes(frame):
    barcodes = pyzbar.decode(frame)
    barcode_detected = False
    barcode_text = ''
    for barcode in barcodes:
      barcode_detected = True
      x, y, w, h = barcode.rect
          # 1. Draw rectangle around the barcode
      cv2.rectangle(frame, (x, y), (x+w, y+h), (0, 255, 0), 2)

          # 2. Extract the barcode data as a string
      barcode_text = barcode.data.decode('utf-8')
      barcode_type = barcode.type

          # 3. Print the barcode type and data to the console
      print(f"Barcode: {barcode_text} | Type: {barcode_type}")

    return frame, barcode_detected, barcode_text
    # return frame, barcode_detected

  # call function in put in application to read the barcode
  def real_time_reading(W,H):
    global flag
    camera = PiCamera()
    camera.resolution = (W, H) # put in function use W = 640, H = 480
    camera.framerate = 24
    rawCapture = PiRGBArray(camera, size=(W, H))
    camera.rotation=270
    time.sleep(0.1)
    for frame in camera.capture_continuous(rawCapture, format="bgr", use_video_port=True):
      image = frame.array
      image = cv2.cvtColor(image, cv2.COLOR_BGR2RGB)
      image, successBarcode, barcode = read_barcodes(image)
      # image, successBarcode = read_barcodes(image)
      image = pygame.image.frombuffer(image, (W, H),'RGB')
      screen.fill(Black)
      screen.blit(image, (0, 0))
      pygame.display.flip()
      # cv2.imshow("Barcode Scanner", image)
      key = cv2.waitKey(1) & 0xFF

      # Clear the stream for the next frame
      rawCapture.truncate(0)

      # if stuck, press 23 button
      if not flag:
        # barcode_menu = {'Type in expire date':(160,30),'':()}
        camera.close()
        return None
        break
      if successBarcode:
        camera.close()
        name = read_productname(barcode)
        flag = False
        return name
        break

  def read_productname(barcode):
    url = "https://barcodes-lookup.p.rapidapi.com/"
    querystring = {"query":barcode}
    headers = {
      "X-RapidAPI-Key": "30d80db95emshcbfe496918fa110p150398jsnd0ddbb49171f",
      "X-RapidAPI-Host": "barcodes-lookup.p.rapidapi.com"
    }
    response = requests.get(url, headers=headers, params=querystring)
    if response.status_code == 200:
      data = response.json()
      title = data['product']['title']
      return title
    else:
      return None

  def checklocation():
    global doorclosed
    global captured_images
    status = 1
    center_x = 0
    center_y = 0
    if doorclosed:
      if status == 1:
        camera.capture(rawCapture, format="bgr")
        image = rawCapture.array

        if len(captured_images) >= 2:
          captured_images.pop(0)

        captured_images.append(image)
        rawCapture.truncate(0)
        print("One image captured, processing...")
        # doorclosed  = False
        camera.close()
        if len(captured_images) == 2:
          print("Two images captured, processing...")
          image1, image2 = captured_images
          # Convert to grayscale
          gray1 = cv2.cvtColor(image1, cv2.COLOR_BGR2GRAY)
          gray2 = cv2.cvtColor(image2, cv2.COLOR_BGR2GRAY)

          # Apply Gaussian blur
          blur1 = cv2.GaussianBlur(gray1, (5, 5), 0)
          blur2 = cv2.GaussianBlur(gray2, (5, 5), 0)

          # Find the difference
          difference = cv2.absdiff(blur1, blur2)

          # Threshold the difference
          _, threshold = cv2.threshold(difference, 50, 255, cv2.THRESH_BINARY)

          # Define kernel for morphological operations
          kernel = cv2.getStructuringElement(cv2.MORPH_RECT, (5, 5))

          # Apply opening (erosion followed by dilation)
          opened = cv2.morphologyEx(threshold, cv2.MORPH_OPEN, kernel)

          # Apply closing (dilation followed by erosion)
          closed = cv2.morphologyEx(opened, cv2.MORPH_CLOSE, kernel)

          # Find contours on the closed image
          contours, _ = cv2.findContours(closed, cv2.RETR_EXTERNAL, cv2.CHAIN_APPROX_SIMPLE)

          # Draw contours on the original image
          largest_contour = None
          largest_area = 0

          for contour in contours:
            area = cv2.contourArea(contour)
            if area > largest_area:  # Only save the largest contour
              largest_area = area
              largest_contour = contour

          if largest_contour is not None and largest_area > 4000:
          # Filter out small changes
            (x, y, w, h) = cv2.boundingRect(largest_contour)
            cv2.rectangle(image1, (x, y), (x+w, y+h), (0, 255, 0), 2)
            cv2.rectangle(image2, (x, y), (x+w, y+h), (0, 255, 0), 2)
            center_x, center_y = x + w//2, y + h//2
            print(f"Center: {center_x},{center_y}")

    return center_x, center_y


  # for exit the threading and the main while loop at the same time
  exit_event = threading.Event()

  # initialize the x and y coordinate
  x = 0
  y = 0
  pos = 0,0

  # detect x and y coordinate, use thread
  def task():
    global x
    global y
    global pos
    pygame.init()
    while not exit_event.is_set():
      for event in pygame.event.get():
        if(event.type is MOUSEBUTTONDOWN):
          pos = pygame.mouse.get_pos()
          x,y = pos
          print(f"mouse down {x},{y}")
        elif(event.type is MOUSEBUTTONUP):
          pos = pygame.mouse.get_pos()
          x,y = 0,0
          pos = 0,0
      pygame.time.delay(100)

  GPIO.setmode(GPIO.BCM)
  # close the project
  GPIO.setup(27, GPIO.IN, pull_up_down=GPIO.PUD_UP)
  # no use
  GPIO.setup(23, GPIO.IN, pull_up_down=GPIO.PUD_UP)
  # E-Switch interrupt
  GPIO.setup(26, GPIO.IN, pull_up_down=GPIO.PUD_UP)
  # shutdown the system
  GPIO.setup(22, GPIO.IN, pull_up_down=GPIO.PUD_UP)
  os.putenv('SDL_VIDEODRIVER','fbcon')
  os.putenv('SDL_FBDEV','/dev/fb0')
  os.putenv('SDL_MOUSEDRV','TSLIB')
  os.putenv('SDL_MOUSEDEV','/dev/input/touchscreen')

  def GPIO_27_callback(channel):
    global MainMenu
    global PutInMenu
    global TakeOutMenu
    global StoredItemsMenu
    MainMenu = False
    PutInMenu = False
    TakeOutMenu = False
    StoredItemsMenu = False
    exit_event.set() # exit the threading at the same time

  def GPIO_23_callback(channel):
    global flag
    flag = not flag

  # E-switch interrupt
  def capture_image(channel):
      global doorclosed
      doorclosed = True

  def shutdown_callback(channel):
    # we need while 1 to paint pitft black
    # without while 1, the main loop will paint pitft again, which causes no black screen when shutdown
    while 1:
      screen.fill(Black)
      pygame.display.flip()
      time.sleep(2)
      os.system("sudo shutdown -h now")

  flag = True
  doorclosed = False
  GPIO.add_event_detect(27,GPIO.FALLING,callback=GPIO_27_callback,bouncetime=300)
  GPIO.add_event_detect(23,GPIO.FALLING,callback=GPIO_23_callback,bouncetime=300)
  GPIO.add_event_detect(26 ,GPIO.FALLING, callback=capture_image, bouncetime=500)
  GPIO.add_event_detect(22 ,GPIO.FALLING, callback=shutdown_callback, bouncetime=500)
  MainMenu = True

  # function to draw the number keyboard
  def draw_keyboard():
      # screen.fill(Black)
      for key in keys:
          pygame.draw.rect(screen, GREY, key['rect'])
          font = pygame.font.Font(None, 30)
          label = font.render(key['label'], True, WHITE)
          label_rect = label.get_rect(center=key['rect'].center)
          screen.blit(label, label_rect)
      pygame.display.update()
      # pygame.display.flip()

  # get the position
  def get_key(pos):
      for key in keys:
          if key['rect'].collidepoint(pos):
              return key['label']
      return None

  # number layout
  key_width = 320 // 3
  key_height = (240 - 70) // 4  # 70 pixels for the text area
  keys = [
      {'rect': pygame.Rect(0, 70, key_width, key_height), 'label': '1'},
      {'rect': pygame.Rect(key_width, 70, key_width, key_height), 'label': '2'},
      {'rect': pygame.Rect(key_width * 2, 70, key_width, key_height), 'label': '3'},
      {'rect': pygame.Rect(0, 70 + key_height, key_width, key_height), 'label': '4'},
      {'rect': pygame.Rect(key_width, 70 + key_height, key_width, key_height), 'label': '5'},
      {'rect': pygame.Rect(key_width * 2, 70 + key_height, key_width, key_height), 'label': '6'},
      {'rect': pygame.Rect(0, 70 + key_height * 2, key_width, key_height), 'label': '7'},
      {'rect': pygame.Rect(key_width, 70 + key_height * 2, key_width, key_height), 'label': '8'},
      {'rect': pygame.Rect(key_width * 2, 70 + key_height * 2, key_width, key_height), 'label': '9'},
      {'rect': pygame.Rect(key_width, 70 + key_height * 3, key_width, key_height), 'label': '0'},
  ]

  # database part
  # initialize a list to store the objects
  inventory = []

  # define a function to add object into the refrigerator
  def add_item(name, expiry_date, location,days):
      # we can only store 3 items in the refrigerator, if >= 3, cannot add any object
      if len(inventory) >= 3:
          print("Inventory is full. Cannot add more items.")
          return

      # we only have three loactions A,B,C in the refrigerator
      # one location can only store one object at a time
      if location not in ['A', 'B', 'C']:
          print("Invalid location. Use 'A', 'B', or 'C'.")
          return

      # create a dictionary to store items information
      # we store the name, expiry date and the location
      item = {
          'name': name,
          'expiry_date': expiry_date,
          'location': location,
    'days' : days
      }
      # append the item to the inventory list
      inventory.append(item)

  # define a function to display the information of all the stored items
  def show_inventory():
      for item in inventory:
          print(item)

  # remove item from inventory list (item is removed from the refrigerator)
  def remove_item(location):
      global inventory
      inventory = [item for item in inventory if item['location'] != location]

  # add_item('Poland Spring', '2023-11-28', 'A','20')
  # add_item('Pepsi Diet Coke', '2023-12-05', 'B',"expire")
  # add_item('Eggs', '2024-01-15', 'C',"200")
  # show_inventory()
  # remove_item('A')
  # show_inventory()

  # for display on the pitft
  def draw_inventory(inventory):
    inventory_menu_font = pygame.font.Font(None, 22)
      # enumerate all the items in inventory
    for index, item in enumerate(inventory):
      inventory_menu = {item['name']:(80,index*30+60),item['expiry_date']:(200,index*30+60),item['location']:(280,index*30+60)}
      if item['days'] == "expire":
        remaining_menu = {item['name']:(80,index*30+150)}
        red_menu = {"expired already":(200,index*30+150)}
        display_menu(inventory_menu,inventory_menu_font)
        display_menu(remaining_menu,inventory_menu_font)
        display_menu_red(red_menu,inventory_menu_font)
      else:
        remaining_menu = {item['name']:(80,index*30+150),item['days']:(170,index*30+150),"d left":(200,index*30+150)}

        display_menu(inventory_menu,inventory_menu_font)
        display_menu(remaining_menu,inventory_menu_font)
    # pygame.display.flip()

  pygame.init()

  pygame.mouse.set_visible(False)
  size = width, height = 320,240
  WHITE = 255, 255, 255
  Black = 0, 0, 0
  GREY = 150, 150, 150
  screen = pygame.display.set_mode(size)

  main_menu_font = pygame.font.Font(None,30)
  main_menu ={'Put in':(80,120),'Take out':(220,120),'Stored Items':(160,200)} # T (60,50) , H (200,50)

  put_in_menu_font = pygame.font.Font(None,30)
  put_in_menu = {'Please open the door':(160,30),'to scan the barcode':(160,70),'Open the Camera':(160,160),'Back':(280,200)}

  take_out_menu_font = pygame.font.Font(None,30)
  take_out_menu = {'Please take out one item ':(160,30),'Back':(280,200),'and close the door':(160,70), 'Complete':(60, 200)}


  stored_items_menu_font = pygame.font.Font(None,25)
  stored_items_menu = {'Name':(80,30),'Expiry Date':(200,30),'Loc.':(280,30),'Back':(290,220)}

  put_in_second_menu = {'Please enter expire date as yyyy-mm-dd':(160,30)}
  put_in_second_menu_font = pygame.font.Font(None,20)

  put_in_close_door_menu = {'Successful scan':(160,30),'Wait for door close':(160,70)}
  put_in_close_door_menu_font = pygame.font.Font(None,25)

  finish_type_menu = {'Succuessful enter!':(160,30),'Exit in 5 seconds':(160,120)}
  finish_type_menu_font = pygame.font.Font(None,30)

  remove_menu = {'Succuessful removal!':(160,30),'Exit in 5 seconds':(160,120)}
  remove_menu_font = pygame.font.Font(None,30)

  temperature = get_temperature()
  humidity = get_humidity()
  temp_hum = {str(temperature):(120,50),'°C':(150,50),str(humidity):(260,50),'%':(290,50)}

  # screen.fill(Black)
  # display_menu(main_menu,main_menu_font)
  # display_menu(temp_hum,main_menu_font)
  # pygame.display.flip()

  Touch = Thread(target = task)
  Touch.start()
  PutInMenu = True

  # make a photo here
  camera = PiCamera() # Set up Camera
  camera.rotation = 270
  camera.resolution = (640, 480)
  rawCapture = PiRGBArray(camera, size=(640, 480))
  time.sleep(1)
  captured_images = [] # Array to store images
  camera.capture(rawCapture, format="bgr") # Capture image
  image = rawCapture.array # Covert the image to mat format for futher processing
  captured_images.append(image)
  rawCapture.truncate(0)
  camera.close()

  # load temperature symbol
  temp_symbol = pygame.image.load("/home/pi/final_project/temp.png")
  # load humudity symbol
  humidity_symbol = pygame.image.load("/home/pi/final_project/humidity.jpg")
  # resize temperature symbol to fit pitft
  temp_symbol = pygame.transform.scale(temp_symbol,(20,40)) # 1:2
  # resize humidity symbol to fit pitft
  humidity_symbol = pygame.transform.scale(humidity_symbol,(40,48)) # 5:6

  while MainMenu:
    time.sleep(0.5)
    temperature = get_temperature()
    humidity = get_humidity()
    temp_hum = {str(temperature):(120,50),'°C':(150,50),str(humidity):(260,50),'%':(290,50)}
    screen.fill(Black)
    # draw temperature symbol
    screen.blit(temp_symbol, (70, 20))
    # draw humidity symbol
    screen.blit(humidity_symbol,(200,20))
    # rect for put in button
    pygame.draw.rect(screen,(255,255,255),(40,100,80,40),2) # screen, color, rect position, border_width
    # rect for take out button
    pygame.draw.rect(screen,(255,255,255),(170,100,100,40),2) # screen, color, rect position, border_width
    # rect for stored item button
    pygame.draw.rect(screen,(255,255,255),(80,180,160,40),2) # screen, color, rect position, border_width
    display_menu(main_menu,main_menu_font)
    display_menu(temp_hum,main_menu_font)

    pygame.display.flip()
    #put_in_menu = {'Please scan the barcode':(160,80),'Open the Camera':(160,160),'Back':(280,200)}
    #take_out_menu = {'Please open the door':(160,80),'Back':(280,200)}
    PutInMenu = True
    flag = True
    doorclosed = False
    # Put in Menu
    if 40 < x < 120 and 60 < y < 180:
      while PutInMenu:
        screen.fill(Black)
        pygame.draw.rect(screen,(255,255,255),(70,140,180,40),2) # screen, color, rect position, border_width
        display_menu(put_in_menu,put_in_menu_font)
        pygame.display.flip()

        # Open camera button
        if 120 < x < 200 and 120 < y < 200:
          product_title = real_time_reading(640,480)
          # shorten the words in title for display
          words = product_title.split()
          # 1 space to split
          # num_spaces = 1
          shorten_title = ''.join(words[:2])

          # check the item location
          doorclosed = False
          if not doorclosed:
            camera = PiCamera() # Set up Camera
            camera.rotation = 270
            camera.resolution = (640, 480)
            rawCapture = PiRGBArray(camera, size=(640, 480))
            while not doorclosed:
              screen.fill(Black)
              display_menu(put_in_close_door_menu,put_in_close_door_menu_font)
              pygame.display.flip()
              loc_x, loc_y = checklocation()
              if loc_x <= 213:
                location = 'A'
                # camera.close()
              elif loc_x >= 427:
                location = 'C'
              else:
                location = 'B'


        DATE = []
        while not flag:
          expire_date = ''.join(map(str,DATE))
          screen.fill(Black)
          number_menu = {expire_date:(160,60),'Skip':(270,220),'Del':(60,220)}
          display_menu(put_in_second_menu,put_in_second_menu_font)
          display_menu(number_menu,put_in_menu_font)
          draw_keyboard()
          num = get_key(pos)
          time.sleep(0.2)
          if len(DATE) == 8:
            expire_date = '{}{}{}{}-{}{}-{}{}'.format(*DATE)
            number_menu = {expire_date:(160,60)}
            input_date = datetime.strptime(expire_date,"%Y-%m-%d")
            current_date = datetime.now()
            remaining_days = (input_date-current_date).days
            if remaining_days < 0:
              remaining_days = str(remaining_days)
              remaining_days = "expire"
            screen.fill(Black)
            display_menu(finish_type_menu,finish_type_menu_font)
            display_menu(number_menu,put_in_menu_font)
            pygame.display.flip()
            add_item(shorten_title,expire_date,location,str(remaining_days))
            time.sleep(5)
            flag = True
            PutInMenu = False


          if num:
            DATE.append(num)

          # Delete button
          if 30 < x < 90 and 180 < y < 240:
            DATE.pop(-1)

          # Skip button
          if 260 < x < 300 and 180 < y < 240:
            flag = True
            add_item(shorten_title,'',location,'')
            time.sleep(0.2)

        # Back button
        if 260 < x < 300 and 180 < y < 220:
          PutInMenu = False

    # Take out menu
    TakeOutMenu = True
    if 200 < x < 240 and 60 < y < 180:
      while TakeOutMenu:
        screen.fill(Black)
        pygame.draw.rect(screen,(255,255,255),(10,180,100,40),2) # screen, color, rect position, border_width
        display_menu(take_out_menu,take_out_menu_font)
        pygame.display.flip()

        # compare the difference to tell which object is moved
        # Complete button
        if 0 < x < 100 and 180 < y < 220:
          camera = PiCamera() # Set up Camera
          camera.rotation = 270
          camera.resolution = (640, 480)
          rawCapture = PiRGBArray(camera, size=(640, 480))
          loc_x, loc_y = checklocation()
          if loc_x <= 213:
            remove_item('A')
          elif loc_x >= 427:
            remove_item('C')
          else:
            remove_item('B')
          screen.fill(Black)
          display_menu(remove_menu,remove_menu_font)
          pygame.display.flip()
          camera.close()
          time.sleep(5)
          break

         # Back button
        if 260 < x < 300 and 180 < y < 220:
          TakeOutMenu = False

    # Stored Items menu
    draw_item = True
    StoredItemsMenu = True
    if 120 < x < 200 and 140 < y < 260:
      while StoredItemsMenu:
        screen.fill(Black)
        display_menu(stored_items_menu,stored_items_menu_font)

        draw_inventory(inventory)

        pygame.display.flip()

        # Back button
        if 260 < x < 300 and 180 < y < 220:
          StoredItemsMenu = False


  Touch.join()